With the autumn chill arriving early this year and the much-anticipated arrival of Baby #3 in late November, I have been busy trying to figure out how to dress myself warmly for the upcoming months. Having had two sons both born during the warm summer months, winter outwear has never been a special issue in our household. I do own a Peekaru babywearing fleece vest and have attempted making a DIY babywearing fleece sweater for wearing my younger son during last year’s milder temperatures, but apart from that, I would just wear what winter jacket I had, while my sons wore theirs.


However, with the forecast of a harsh upcoming winter season, I began to do my fair share of mommy research on how to bundle up my growing belly and newborn baby.
If I had an unlimited budget on hand, the easiest route would’ve been to buy a manufactured maternity/babywearing jacket. Some popular brands include: Suse’s Kindercoat, Moa Po, and Mantoo. These wonderful creations usually involve zip-in panels that accommodate a growing pregnant belly or a baby worn in a front carrier. If you’re lucky to afford a fancier design, it may even allow for hip, back, and tandem carries, too. However, most of these jackets are only available through online retailers (making them hard to size without trying on, especially when most seem to fit larger than regular clothing). They also cost much more than I am able to afford, often retailing at $150+ (and that doesn’t include taxes or shipping charges). I even attempted looking for used jackets in local babywearing groups and Kijiji. However, being on the petite side, there were none available in XS and even used ones in larger sizes were still asking for $100+.
The more affordable ready-to-go option would be to purchase just a zip-in extension panel to use with my existing collection of jackets. For $60-$100, you could transform your favourite jacket into a maternity or front-carry babywearing jacket. Unfortunately, upon contacting the major companies that I knew of (ex. Kokoala, and Make My Belly Fit), I realized that none of my existing jackets had zippers that were compatible with the typical YKK brand of zippers. Make My Belly Fit were nice enough to suggest a “DIY” option, where I could purchase a compatible zipper from them and sew it behind the zipper of my own jacket…which got me thinking: if I’ve got to break out my sewing machine to sew on the extra zipper, why not save the money and try making my own maternity/babywearing jacket extension altogether?
And this is how my latest sewing project began! I did my best to photograph and document the steps I took to create my own belly extension panel…however, please excuse any shortcomings in my instructions and/or methods. I am not a professional seamstress and only learned to use my mother’s old Singer machine (via online tutorials and YouTube videos) after my first son was born four years ago. Also, you will want to skim/read the whole tutorial before working on your own panel as I add various notes here and there about mistakes I made and/or things that I would do better/differently. No matter what, I hope this mini tutorial is able to inspire and help other moms in converting their own jackets during pregnancy and postpartum =)
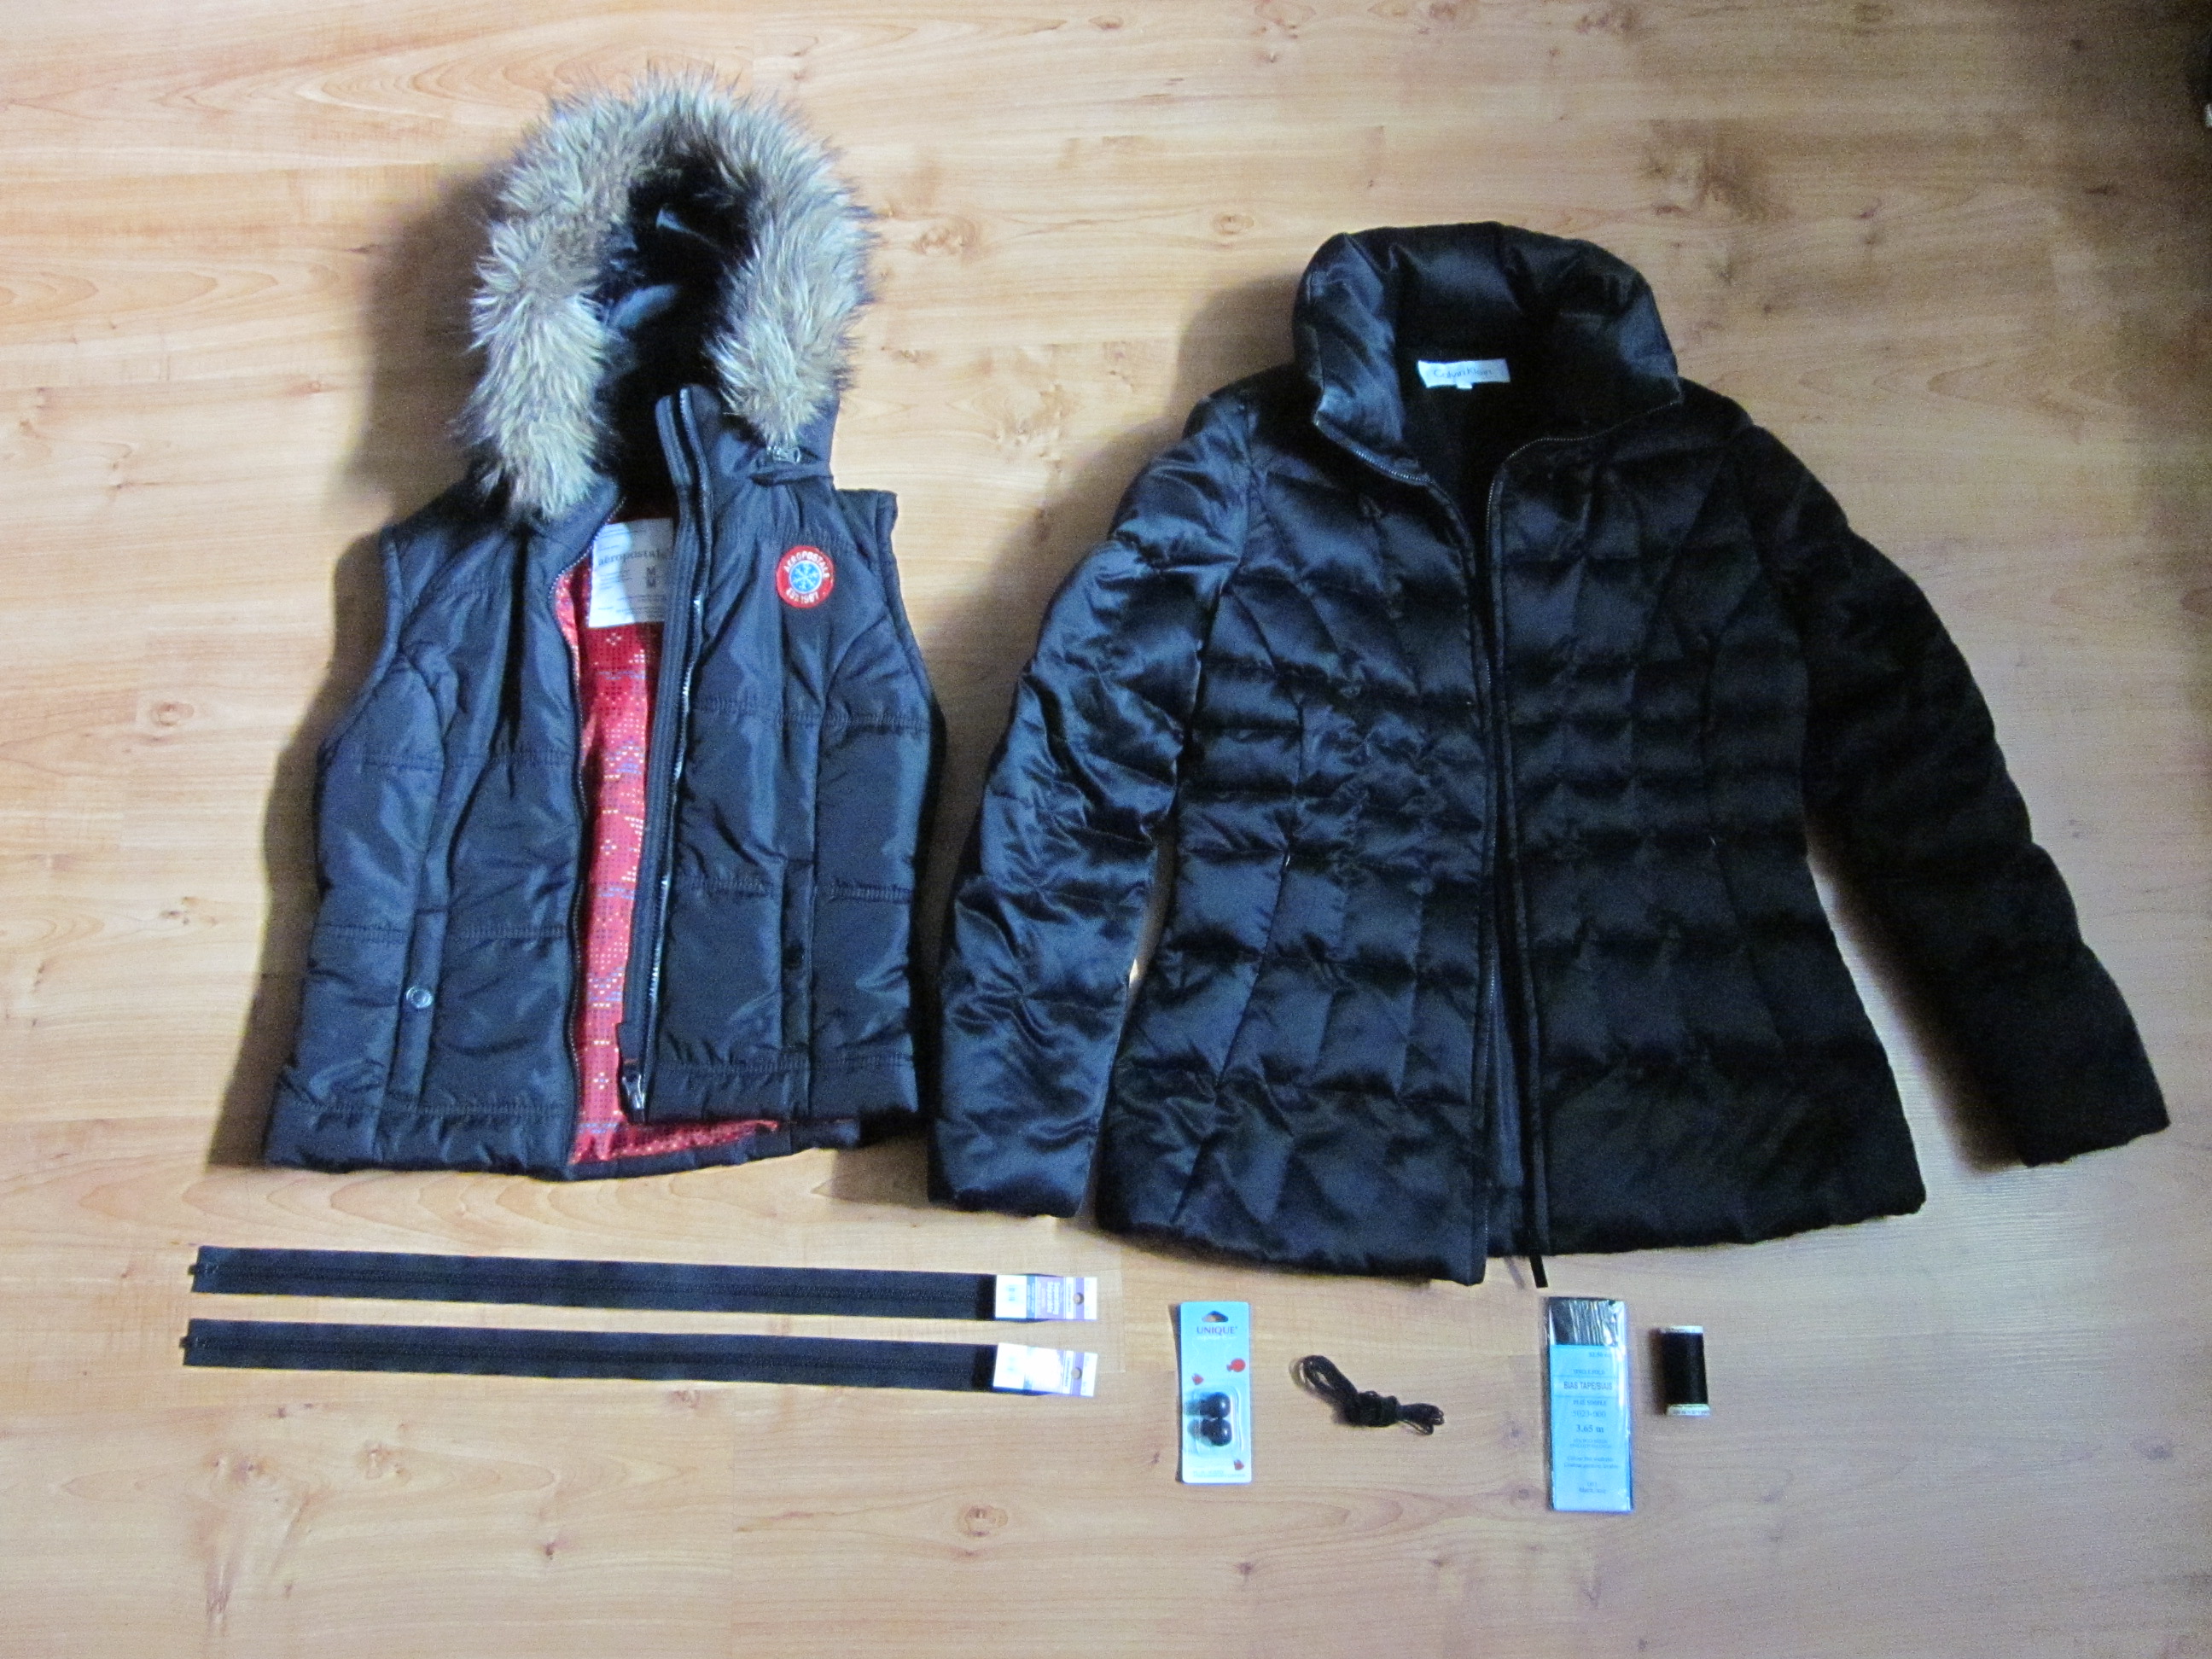
Materials:
• an old puffy vest (or any material warm and wind-resistant enough) to re-purpose as an insert
– My panel was slightly narrower than the full back of the vest – roughly 23″ in height and 10″ at the widest part.
• an old winter jacket to use as your main babywearing jacket
– Mine had a 27″ zipper.
• 2 separating zippers
– I got 22″ lengths, and attached one set to my insert and the other just behind my jacket’s existing zipper. In the future, I would likely buy a length longer than my panel and fold down or trim the excess to utilize the full length of the panel.
• 2 cord stops
• elastic cording
– long enough to span at least twice the width of the finished insert
• single fold bias tape to sew a casing for elastic cording
• matching (and contrasting) thread
– Gutterman polyester is what I used.
• pins


2) Next, decide the approximate shape you would like your finished panel to be. This is the trickier part in terms of planning out your extension panel. The best thing to do is to put on the jackets that you intend on using the panel with to gauge how wide you need certain parts (especially at the very top and bottom of your panel). Use your trusty tape measure and mark out the shape of your panel onto your material. In my case, I had to use a series of pins as tailer’s chalk or fabric markers would not be visible on the black nylon that I was using.
a) If you are only looking to use your panel during pregnancy, you can get away with making a panel that starts off narrow up top, widens to about 10″-12″ around the navel and narrows slightly at the base.
b) If you are planning to only use your panel for postpartum babywearing, you can do the inverse (with the widest part up top and the narrowest section at the base).
c) If you want to use the panel for both purposes (like mine), then you will likely want something that is widest through the mid section and narrows slightly at both top and bottom.


*Note: In hindsight, if you do make a pregnancy panel that is narrow at the top and wide at the base, but realize that you want to give babywearing a try, you can sew two additional sets of zippers together with their teeth and pulls facing opposite directions to invert your panel and transform it into a babywearing panel.
3) If you are using a single layer of fabric for your panel, you can skip this step and go to step #4. If you are re-purposing a multi-layered/filled vest or jacket like I am, sew two sets of close-set lines about an inch or so out from your marked panel. You want to sew two sets of lines to minimize shifting in the layers within your garment and also to prevent losing any stuffing when you cut our fabric. I always like to aim wider (in case I need to trim or even things out later) and the extra inch in width will also account for seam allowance when sewing your zippers.
I set my sewing machine to sewing the longest straight stitches possible (length setting #4 on my Singer machine) and used a contrasting colour of thread (white against black) so that I could visually check the shape of my panel, and rip threads or re-sew as needed.

4) Get ready to cut your first side! Once you are happy with the shape of your panel, cut out the fabric following your markings. If you are working with a single layer of fabric and skipped step #3, just be sure to leave about an extra inch in width to account for any trimming you may need to make and for seam allowance. If you completed step #3, take a pair of sharp fabric scissors and carefully cut between the two lines you had sewn onto your fabric. Be sure that the layers of your fabric are flat while you cut and that nothing is accidentally folded over on the underside of your scissors! (I accidentally snipped the interior layer of my vest on the first side and had to shift the fabric on the other side to fix my mistake.)


5) Even though I had already marked my second side for cutting, after cutting my first side, I realized that due to the handmade aspect of the project, the slippery quality of my materials, etc., that the second side of my panel was no longer symmetrical. Therefore, I folded my panel along the middle, pinning it in place, and used the first cut edge as a guide to re-sewing my two sets of lines for the second side of my panel for a more symmetrical result.


6) Cut the second side of your panel as you did in step #4. Critique and trim as needed to get the shape you want. This is a good time to do a preliminary test by putting on your jacket and placing the panel on your front to gauge if you have too much or too little width in the right places.

7) Separate one of your zippers and pin one half along each side of your panel. Make sure your zipper halves are oriented properly (so that the zipper will zip shut from bottom to top) and that your panel’s fabric and zipper are facing with their right sides together. You want the edge of the zipper tape (ie. the fabric portion opposite the zipper teeth) to match up with the edge of your panel fabric). Also, remember to fold over the excess bit of zipper tape at the top of your zipper (the bit that extends beyond the zipper’s top stops) for a less scratchy and more professional result.
If your panel is longer than your zipper, I’d recommend matching up the tops of the panel and zipper (as opposed to the bottoms). This way, your panel will zip all the way up as opposed to having a bit of an odd flap up top. If you are worried about drafts coming in from the bottom, you can easily remedy that with an elastic cord and cord stop (which I’ll show you how to do later).


8) Using a shorter straight stitch (length setting #2 on my Singer machine) and a matching thread (black on black), sew the zipper to your fabric (preferably while using a sewing foot). Try to sew straight along and as close as possible to the zipper teeth. Take your time to make sure that you catch all the layers with your sewing needle. Your zipper is now attached to your panel!

9) For a cleaner look, trim back any fabric that is under your zipper tape. Again, do so slowly and carefully, using your fingers to separate the layers of fabric and guide your scissors. Make sure not to accidentally snip the fabric on the body of your panel.

*Note: This photo was taken BEFORE I trimmed the fabric. As you can see, the white foam insulation between my outer layers of fabric was visible along the zipper tape. I trimmed it back so that these layers would be hidden by the zipper tape once I proceeded to tack it in place in the next step.
10) Fold fabric along the line you had sewn to attach the zipper in place. The teeth of your zipper should be facing outwards (away from the panel). The trimmed layers of fabric (form the previous step) should be sandwiched between the zipper tape and the interior fabric of your panel. Pin the zipper tape in place.
11) Sew along the straight edge of the zipper tape. The finished result should be something like this.


12) I am almost 32 weeks pregnant and I find my panel to be a bit wide at the top and bottom. However, I decided it would be better to go wide than too narrow (in case I get larger with pregnancy or choose to front carry my toddler in the future).
To provide some adjustment in width for the time being, I added two elastic cords and cord stops – one near the top (which I actually hid in the lip of fabric remaining from the vest’s old hood zipper) and a second near the bottom for keeping out drafts (just under the curve of my pregnant belly). If you want a more fitted or defined look, you can add a third one just below the bust.
If this step is too much fuss for you, simply skip it and just make a slimmer panel to begin with.
Unfortunately, I did not document this step too well, as I kind of made it up as I went along. (Sorry if it’s unclear, but hopefully, I can explain it well enough without many visuals.)
Basically, I sewed two lengths of single fold bias tape along the width of my panel to create a casing for my elastic cord. I sewed along the two long edges, leaving a space in the middle for the elastic cord to go through. I folded over the end so the bias tape for a finished look (ie. no fraying raw edges) and left a gap in the middle between the two lengths to attach a cord stop.
I’m not sure what the proper way is to tack down the ends of the elastic cord…however, simply going over the straight cut end of an elastic multiple times doesn’t always do the job for me. I managed to pull the elastic loose by tugging on it that way…What did work for me is tying a small knot at the end of the elastic cord and tacking the elastic down to the fabric just next to the knot. The knot seems to help the elastic from shifting out between the stitches.

Your extension panel is now complete!!!
If you’re lucky enough to own a jacket with a zipper that is already compatible with the one on your extension panel, just zip the panel to your jacket and you’re ready to stay cozy and warm in the chilly weather!
If you’re not so lucky (like me), it’s time to add a compatible zipper to your jacket!
13) Separate your zipper and pin one half just behind each of your jacket’s zippers. Again, make sure your zipper halves are oriented properly (so that the zipper will zip shut from bottom to top). You want the teeth of the compatible zipper to sit just behind those of your jacket’s existing zipper. And again, remember to fold over the excess bit of zipper tape up top for a less scratchy and more professional result.
If your jacket is longer than your panel, I’d recommend installing the zipper to sit flush at the top. This way, your panel will zip all the way up to the top of your jacket for a cozier fit.

14) Sew the compatible zipper to your jacket. For a cleaner look, I sewed the zipper on with the outside of the jacket facing me and did my best to sew on top of the existing stitches from the jacket’s own zipper (see photo below for the stitching visible between my finger and the pin).

15) Zip your panel onto your jacket and you’re ready to go! =D


Here I am modeling my winter jacket (from top to bottom, left to right):
1) zipped up tightly over my pregnant belly
2) clearly not large enough to zip over me with a baby doll wrapped in front
3) nice and cozy while carrying baby doll
4-6) using elastic cords to adjust for growing pregnant belly

*Note: I took these photos before fixing the zipper on my panel to sit flush at the top (which is why it doesn’t zip all the way to the top and there’s a bit of a funny-looking flap).
I later found another old winter jacket hiding in my closet that had a compatible YKK zipper. YAY! No additional sewing required! I also added a compatible zipper to my light fleece-lined jacket for the current mild fall temperatures.


And so, I got THREE pregnancy/babywearing jacket by using the same extension panel for a whopping total of $20-$25! All the jackets and the vest were given to me as gifts over the years and all the additional sewing notions were purchased at either Fabricland or Walmart.
Anyways, thanks for checking out my first sewing project “tutorial” ever! I hope it was helpful and inspires you to make use of what you’ve got at home to create new and exciting things!

So. Amazing! You’re one talented mama!
Great project! I’m a beginner sewer and haven’t much experience with zippers yet, so this scares me a little to take on, but with your directions I might try it. Thanks for sharing!
I completely understand! I was quite intimidated by zippers when I first tried working with them…but they really aren’t that scary! I gained confidence by making a simple zipper pouch (similar to this: http://www.sewdelicious.com.au/2012/09/simple-zip-pouch-tutorial-for-beginners.html?m=1) to get the hang of how to install one.
If zippers still aren’t your thing, you could always use buttons, snaps or velcro to try and attach your panel to your jacket.
Great job Ang! Final product looks fantastic.
Thank you so much for the time you put into documenting this project. I will be putting myself to work soon with your instructions!
Thank you so much! I just finished this (along with my mom), and it looks amazing. I happened to have an old vest so the whole project cost $8 (WAAAAY less than the ones online- $100?!) and it looks great, works really well and most importantly keeps me warm. I’m sooo glad to be able to use my coat again. I’d definitely recommend this as the best solution to the preggo coat problem 🙂
Looks awesome!! Thank you so much for posting this. I know I could go the easy route and buy a premade one, but I love the challenge of attempting to make one, and save money (hopefully, if it turns out) at the same time. Now if I could only find a video to watch, eventhough your pics are perfect and the tut is fantastic as is
So glad that this has inspired you to try a DIY version for yourself! If I could do it, you certainly can, too!
I’ll try and make some videos next time if possible, but I’ve got 3 young kids in the house and I’m not sure how many takes it would require for a proper video tutorial. Haha! Good luck on your project!